Waffle cones are a delicious treat that you can use to make the perfect ice cream cone. As we all know, ice cream cones are at their best when they’re freshly made and piping hot.
Sure, you could take them up from the store where they sell ice cream, but by taking just a few steps at home, your cones will be better than any store-bought version out there.
The perfect waffle cone is crispy-on-the-outside and soft on the inside. Here, we’ll explore how to make the perfect ice cream cones (waffle cones) at home.
Step-By-Step Guide To Make The Best Waffle Cones

If you’re looking for the best way to make waffle cones at home, you’ve come to the right place. AboutWaffle has rounded up some tips and tricks to help you get the perfect cone every time.
1. Use High-Quality Flour

While it may seem like a small detail, using high-quality flour will make a huge difference in your final product.
You want to use flour that is made from wheat that’s been milled by slowly grinding it so that each grain stays intact and is not damaged during milling. This will result in a more flavorful product, as well as a more tender texture.
2. Make Sure Your Heat Source Is Consistent

When waffle cones are made in large quantities, they can be tricky to keep consistent because an unequal amount of heat travels through them when they’re being cooked.
If you don’t have an oven with an even distribution of heat (and most people don’t), this could mean that some cones are crispier than others or burned on one side while still raw on the other side.
Make sure your oven has an even distribution of heat across every surface. If it doesn’t, buy an oven thermometer and adjust accordingly until you get it right!
3. Use The Right Tool

If you want to make ice cream cones at home, then invest in a good waffle cone maker.
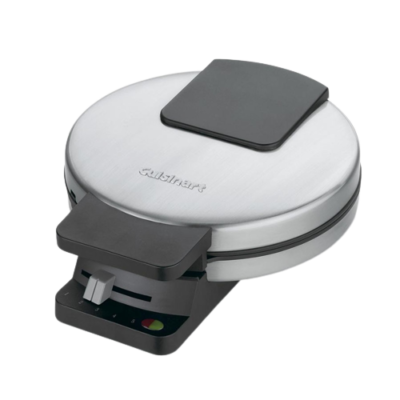
Best Waffle Cone Maker | Cuisinart WMR-CA
This Cuisinart Waffle Maker model is designed for durability, easy use, and most importantly, consistently perfect results. The machine produces four 4-inch waffles from a single batter, making it an excellent choice for families with children who want to eat together. The nonstick interior means no more scrubbing or oiling your unit after cooking, and the brushed stainless exterior ensures it’s ready to go whenever you are.
Pros
- Adjustment control for browning
- Brushed stainless steel cover
- Cord storage is given
Cons
- Hinges are a bit wobbly so it needs handling with care
You can use an electric machine or even a stovetop one if you prefer.
4. Prepare Your Ingredients

Take out all of your ingredients and have them ready before you start making your cones. You will need flour, sugar, eggs, and milk (or water). You can also add some vanilla extract if desired for an extra flavor boost!
5. Mix Up Your Batter

Mix all of your ingredients together until they form a nice batter that isn’t too thick or too runny.
If it looks like there are still lumps in the mixture after mixing, then try adding a bit more flour until everything is smooth and lump-free again!
Waffle Cones Recipe Card
INGREDIENTS
- 2 egg whites
- 1/4 cup heavy cream
- 1/2 cup granulated sugar
- Pinch of salt
- 1 teaspoon vanilla bean paste or extract
- 1 teaspoon almond emulsion or extract
- 6 tablespoons unsalted butter, melted
- 2/3 cup all-purpose flour
INSTRUCTIONS
- Add the egg whites and heavy cream to a mixing bowl.
- Add the sugar, vanilla, and almond extract.
- Whisk to combine and stir in the butter and flour. Whisk to combine.
- Preheat your waffle cone machine.
- Scoop 1/2 cup of the batter into the machine and press down. Cook for 1 minute.
- Remove the cone and immediately roll on the mold to form.
- When you are molding your cones add another batch of batter to the waffle maker.
- You can also make waffle cups by placing the waffle on top of a cup and pinching down the sides or place in a small bowl or cup and placing another cup inside.
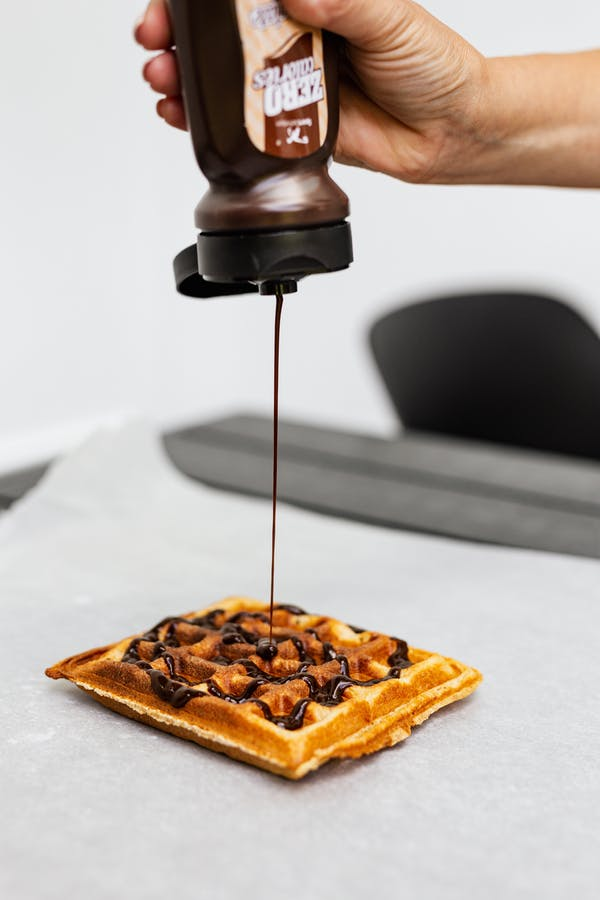
- Let cool and serve with ice cream of choice.
How To Make Waffle Cones Without Waffle Maker?

- Take 1/4 cup of the batter and pour it into the hot skillet.
- To spread the batter into a thin 5 to 6-inch circle inside the skillet, lift the skillet and gently tilt it in a circular motion.
- Over medium-low heat, cook for 3 to 4 minutes, or until the bottom begins to softly brown.
- With a spatula, carefully flip the dough over and cook until browned on the other side.
- Remove the dough from the skillet and use a cone roller or free-form rolling to roll it into a cone shape.
- Make sure you close the waffle cone from the bottom by pinching it to prevent leaks.
- Turn the cones upside down on a wax paper-lined baking sheet to cool and crisp.
- To finish making your waffle cones repeat the same procedure with the remaining batter.
How Can You Shape Your Waffle Cones Perfectly?
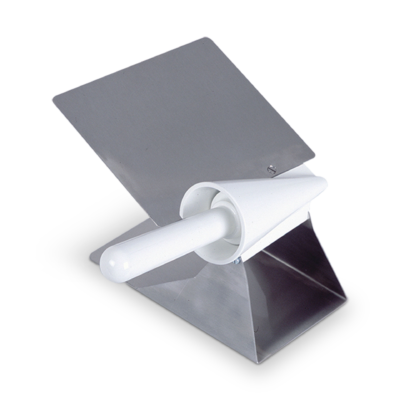
Making your waffle cones is particularly enjoyable because you may shape them into bowls or conventional shapes (waffle cone maker).
- To make the waffle cones, place the bottom of a glass cup on the waffle cones. Pinch the sides together and set them aside to cool completely.
- You can also make a bowl by pouring the hot waffle batter into a bowl.
- Place a smaller bowl on top of the waffle and lightly push the waffle down.
- Remove the inside cup and set it aside to cool.
Variations
There are some variations that you can try with this recipe.
Here you will learn how to make cones in different flavors.
The following are some other versions:
- Orange: Toss in 1/2 teaspoon orange extract and 1 orange zest into the batter.
- Lemon zest: Toss 2 lemons zest into the batter.
- Almond emulsion: Toss 1/2 teaspoon almond emulsion into the batter.
- Cinnamon: Toss 1/2 teaspoon cinnamon powder into the batter.
- Add 1/2 teaspoon chocolate powder and 1/2 teaspoon red food coloring to make red velvet.
Toppings
To make your waffle cones more special, dip them in chocolate and roll them in creative toppings.
Here are some of our favourite dipped waffle cone toppings.
- Graham Crackers
- Mini Chocolate Chips
- Crushed up Oreos
- Cereal
- Brownie Pieces
- Reese’s Pieces Candy
- Cookie Pieces
- Multicolored SprinklesCrispier
How Do You Make Waffles Cones Crispier?

Waffle cones get crispy when the batter is cooked for a long time in the machine.
It is advised to modify the crisp setting to your liking. Cook the batter for longer for crispier waffle cones.
How Can You Choose A Waffle Cone Maker?

There are many types of waffle cone makers available in the market, but some of them have a tendency to break.
You need to choose the right one that will not break while making ice cream cones.
Here is how you can do it:
There are various kinds of waffle cone makers available in the market, and they come in different shapes and sizes. If you want to make large cones for serving ice cream at parties or for selling at your shop, then you should buy a larger one.
If you want to make small cones for serving at home, then go for a smaller one.
It is important to choose a waffle cone maker with an even heat distribution as it will prevent any burnt spots on your cones. The heat should be evenly distributed across the surface of the cone so that all sides get cooked well without getting burnt or overcooked before reaching the desired brownness.
An unevenly heated waffle cone maker may cook one side well and leave another side uncooked because they do not get enough time to cook properly due to uneven heating. This will result in unevenly cooked waffle cones which may break when filled with ice cream and eaten immediately after making them
You have got the Cuisinart WMR-CA Waffle Maker, which is so good that you should even ask someone to gift you this at your wedding.
Difference Between Waffle Cone Maker AND Waffle Iron!
It must come as a shock to you that the waffle cone maker and waffle iron are not the same things.
It is recommended that making the waffle cone with the normal waffle maker would be a waste of time. Deep grids on waffle irons are designed for huge, fluffy Belgian waffles.
Waffle cone makers feature a very shallow grid – you want them to fold quickly into a cone and be just thick enough to support delectable ice cream.
On the contrary, if you attempt to wrap the Belgian waffle into a cone, you’ll wind up with something that’s awful. But you can make a massive ice cream sandwich out of Belgian waffles.
How To Make The Batter For Waffle Cones?
- In a medium mixing bowl, whisk the sugar, egg whites, and vanilla extract together.
- Then, add half of the flour and whisk the mixture until it becomes very smooth.
- Now, add the remaining flour, salt, and melted butter.
- Finally, whisk the mixture together until it is completely smooth.
How Do You Use A Waffle Cone Maker?
Every waffle maker comes with an instruction book.
Your waffle cone maker must have a booklet with instructions and a description of the various functions, but finding the optimum settings for you will require some trial and error.
Frequent waffle makers take from 2 to 3 minutes to understand any machine.
The waffle cone maker also comes with a plastic cone to help you shape your waffle in a cone.
How to Store Waffle Cones?
Waffle cones can be kept at room temperature for up to three days. If you keep them for longer than that, they will become softer. To crisp them up, place them in the oven at 350 degrees for 2 minutes.
What Is The Shelf Life Of Waffle Cones?
They can be kept at room temperature for up to three days.
Although they can be stored for up to three days, it is recommended that they should be made right before serving. They’re always better when they’re fresh!
FAQs
Best Waffle Cone Maker | Cuisinart WMR-CA